A roof leak rarely starts as a dramatic drip from the ceiling. Most of the time, it shows up as a faint stain, a musty smell in the attic, or shingles that look a little off after a storm.
If we catch it early, roof leak repair can be straightforward and affordable. If we ignore it, that same small leak can lead to mold, rotten decking, ruined insulation, and expensive structural damage.
Recognizing The Signs Of A Roof Leak
Finding a roof leak starts with paying attention to the subtle warning signs inside and outside your home.
Interior signs you may have a roof leak
Look for:

- Brown or yellow ceiling stains: Often round or irregular patches on ceilings or upper walls.
- Peeling or bubbling paint: Moisture pushes paint away from drywall or plaster.
- Soft or sagging drywall: Indicates water has been soaking in for a while.
- Musty smells in the attic or upper rooms: Trapped moisture can create a damp, earthy odor.
- Visible dripping during or after rain: The most obvious sign, but usually a late-stage problem.
If you live in a place like Salt Lake County where we see heavy snow, also pay attention right after snowmelt or an ice storm. Leaks can appear only during those conditions.
Exterior signs on the roof and exterior walls
From the ground, binoculars, or a safe vantage point, check for:
- Missing, cracked, or curled shingles
- Damaged or rusted flashing around chimneys, skylights, and vents
- Granules in gutters indicating shingle wear
- Dark streaks or patches on the roof surface
- Moss or algae growth in specific spots that may hold moisture
On exterior walls, watch for staining or streaks below rooflines or gutters, which can point to overflow or water getting behind the siding.
Recognizing these early signals is the first step toward effective roof leak repair and avoiding a much larger issue later.

Common Causes Of Roof Leaks
Not all roof leaks are created equal. Understanding what typically causes them helps us decide whether a simple patch is enough or if there is a bigger issue at play.
1. Aging shingles and normal wear
Even the best roofing materials have a life span. In Utah's mix of hot sun, winter snow, and big temperature swings, shingles dry out, crack, and lose protective granules. As they weaken, wind-driven rain can work its way underneath.
2. Damaged or poorly installed flashing
Flashing is the thin metal around chimneys, skylights, roof valleys, and vent pipes. If it is bent, rusted, missing, or was never sealed correctly, water can follow the flashing straight into your home.
3. Roof penetrations and fixtures
Any hole in the roof surface is a potential leak point:
- Bath and kitchen vents
- Plumbing vent stacks
- Satellite dishes
- Skylights
- HVAC lines
If the seals, boots, or gaskets around these penetrations crack or shift, water can sneak in.
4. Clogged or damaged gutters
When gutters are full of leaves, ice, or debris, water backs up and can run under the shingles instead of down the downspouts. This is a common issue along the Wasatch Front after fall leaf drop and winter storms.
5. Ice dams
In snowy climates, warm air from the home melts snow on the roof. The meltwater runs toward the eaves and refreezes, forming an ice dam. Water then pools behind the dam and can force its way under shingles.
6. Punctures from debris or foot traffic
Tree branches, wind-blown debris, or frequent walking on the roof can damage shingles and underlayment. Even small punctures can turn into leaks during a heavy storm.
Once we understand the cause, we can match the right repair method and decide if DIY is realistic or if a professional repair is the safer route.
How To Track Down The Source Of A Roof Leak
Water is sneaky. Where you see the stain inside is often not where the roof is actually leaking. Finding the true entry point is half the battle.
Step 1: Start in the attic
If you have safe access to the attic, grab a flashlight and:
- Look for dark stains, wet insulation, or moldy spots on the underside of the roof deck.
- Trace water trails or drip marks back uphill toward the ridge.
- Check around chimneys, vents, and any roof penetration.
Go up after a rainstorm if possible, while things are still damp. Just be careful to step only on solid framing, not the drywall below.
Step 2: Compare interior and exterior locations
Measure from the nearest wall to the stain on your ceiling. Then use that measurement outside to narrow down the section of roof above the problem area. This helps you zoom in on where to inspect shingles and flashing.
Step 3: Hose test (with two people)
On a dry day:
- One person stays inside in the attic or under the suspected area.
- The other person uses a garden hose on low pressure, soaking one small section of roof at a time, starting from the bottom and moving upward.
- When water appears inside, you have found the general area of the leak.
Move slowly and give each section a few minutes. This method is simple but very effective.
Step 4: Look for patterns
Ask a few questions:
- Does the leak only appear during wind-driven rain from one direction?
- Does it show up after snowmelt, not regular rain?
- Does it only appear after long, heavy storms?
These clues tell us whether we are looking at a flashing issue, an ice dam, or a more general wear problem.
If you cannot safely access your roof or attic, or if the leak is near structural components, this is a good point to bring in a professional roofer for a leak inspection.
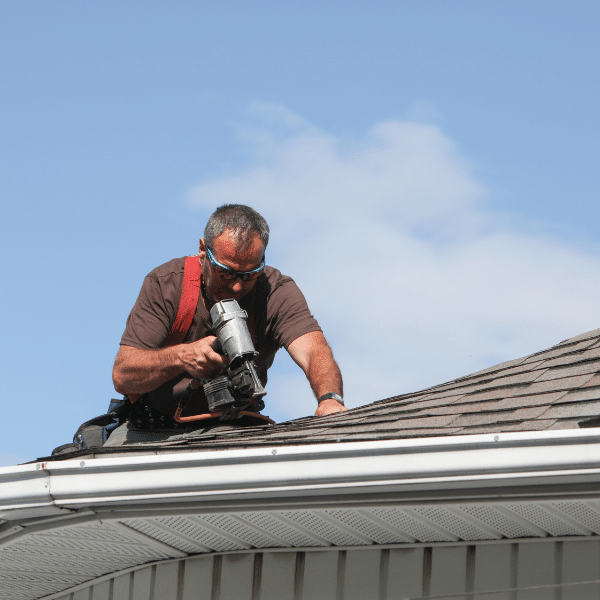
Step-By-Step Roof Leak Repair For Homeowners
Every roof is different, but many simple asphalt shingle leaks follow a similar repair process. Here is a general outline you can adapt to your situation.
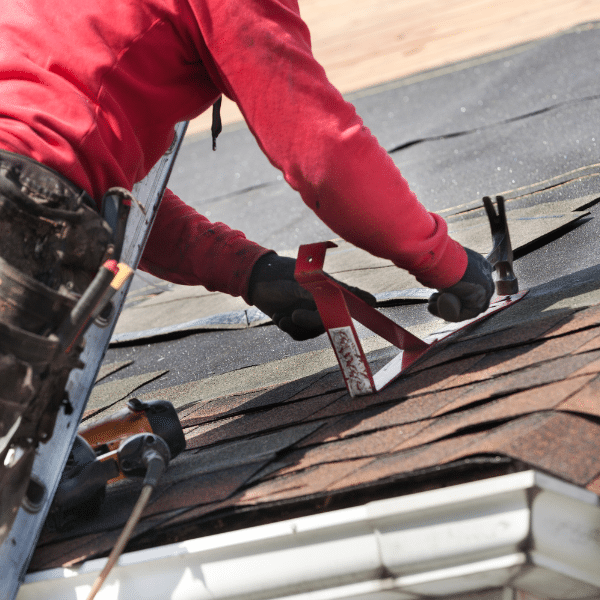
1. Replace a damaged shingle
If you have a cracked, curled, or missing shingle where you have traced the leak:
- Loosen the shingles above using a flat bar. Gently lift the edges to expose the nails.
- Remove the nails holding the damaged shingle and slide the shingle out.
- Slide a new shingle into place, aligning it with the existing course.
- Nail the new shingle using roofing nails in the designated nail strip.
- Seal the tabs with a small amount of roofing cement under the edges.
2. Reseal flashing around vents or chimneys
If the leak seems to come from flashing:
- Clean away any loose caulk or sealant.
- Check for gaps between metal flashing and roofing or masonry.
- Apply a bead of high-quality exterior sealant to close small gaps.
- If flashing is cracked, bent, or pulling away, it usually needs to be replaced, not just sealed.
Replacing flashing can be tricky because it often requires lifting nearby shingles and sometimes cutting into mortar at chimneys. Many homeowners let a professional handle this part.
3. Temporary emergency patch
If a storm is coming and you cannot fully repair the leak yet:
- Use roof patch tape or peel-and-stick membrane over small holes or cracks.
- Cover a damaged area with a tarp securely fastened with boards or weighted edges, extending several feet past the damage.
These are short-term solutions only. They buy time until a permanent repair or roof replacement can be made.
When DIY is not enough
If your roof is older, the leak is in multiple locations, or the decking feels soft underfoot, patching individual spots might not solve the bigger issue. In those cases, a professional inspection gives you a clear plan, whether that means more focused repairs or a full roof replacement.
When To Call A Professional Roofer
Roof leaks are stressful. It is tempting to try to handle everything yourself, but sometimes the safest and most cost-effective choice is to bring in a professional.
We recommend calling a roofing contractor when:
- The leak is severe or water is actively running inside.
- You cannot trace the source after checking the attic and visible roof.
- The roof is steep, high, or in poor condition, making it unsafe to walk on.
- Multiple leaks show up in different areas of the home.
- The roof is near the end of its life and repairs are becoming frequent.
A good roofer will:
- Perform a full roof and attic inspection (what is included in a roof inspection)
- Identify the root cause of the leak
- Give you clear repair or replacement options with pricing
- Explain warranty coverage on both materials and workmanship
For homeowners in Salt Lake City, West Valley City, Sandy, Murray, South Jordan, and across Salt Lake County, working with a local Utah roofing expert also means we understand our specific weather patterns, building codes, and common roof styles.
If you are unsure whether you need help, schedule a roof leak inspection and let a professional confirm the best course of action before the damage spreads.
Preventing Future Roof Leaks
Once we fix a roof leak, the next goal is making sure it does not come back. A little maintenance goes a long way.
Schedule regular roof inspections
Have your roof inspected every 1 to 2 years, and after major wind or hail storms. A trained eye can spot small issues long before they show inside your home (learn more in this comprehensive guide to roof inspections in Salt Lake City).
Keep gutters and downspouts clean
Clean gutters at least twice a year, more often if you have trees nearby. Make sure downspouts discharge away from the foundation and are not clogged (see these tips for caring for your gutters and the dos and don’ts of cleaning your gutters). Installing leaf guards can also reduce clogs and maintenance.
Maintain attic ventilation and insulation
Proper ventilation and insulation help:
- Reduce ice dams in winter
- Extend the life of shingles
- Prevent condensation and mold
If you see frost on nails in the attic or notice extreme temperature swings, it may be time to improve ventilation (here’s why proper ventilation is important for your home roof and why attic ventilation is important for your roof).
Trim nearby trees
Branches that hang over the roof can rub against shingles, drop debris, and even puncture the roof during a storm. Keep branches trimmed back so they are not resting on or too close to the roof surface.
Address minor issues quickly
Small problems rarely stay small. If you notice lifted shingles, small flashing gaps, or minor leaks, schedule repairs promptly. This is almost always cheaper than waiting until there is visible interior damage. Regular maintenance like these essential roof maintenance tips for your home can significantly extend your roof’s lifespan.
By combining smart maintenance with professional support when you need it, you can extend the life of your roofing system and protect your home for decades.
Roof Leak Repair FAQs
Early signs you may need roof leak repair include brown or yellow ceiling stains, peeling or bubbling paint, soft or sagging drywall, musty smells in the attic, and visible dripping during or after rain or snowmelt. Catching these issues early helps prevent mold and costly structural damage (see also 5 signs your roof needs to be repaired and the most common roof problems).
Start in the attic and look for dark stains, wet insulation, or mold on the roof deck, then trace water trails uphill. Measure from interior stains to locate the area outside. If needed, use a two-person hose test, soaking small roof sections until water appears inside to pinpoint the leak. For more detailed guidance, review how regular roofing inspections can save you money in the long run.
Minor issues like a single damaged shingle or small flashing gap can sometimes be DIY repairs if you’re handy and can work safely. However, steep or aging roofs, multiple leaks, soft decking, or leaks you can’t trace are best handled by a professional roofer to avoid injury and hidden damage (and to avoid the risks outlined in 5 alarming reasons why DIY roof repair is never a good idea).
To prevent roof leaks, schedule roof inspections every 1–2 years and after major storms, keep gutters and downspouts clean, maintain proper attic ventilation and insulation, and trim overhanging branches. Address small problems—like lifted shingles or minor flashing gaps—quickly before they turn into larger, more expensive repairs. You can also follow this homeowner’s guide to preparing for winter to reduce cold-weather damage.
Roof leak repair costs vary widely based on the cause, roof material, and severity. Simple shingle or small flashing repairs may cost a few hundred dollars, while widespread damage, rotten decking, or structural issues can run into the thousands. A professional inspection and written estimate clarify your specific costs. If damage is storm-related, you may also want to understand how to submit an insurance claim for your roof and how to get insurance to pay for roof replacement in Utah.
Homeowners insurance may cover roof leak repair if the damage results from a sudden, accidental event like wind or hail, and the roof has been properly maintained. It typically does not cover leaks caused by age, neglect, or lack of maintenance. Review your policy and document damage before filing a claim (and consider whether it is worth claiming roof damage on insurance).
Contact the Experts for Roof Leak Repair Services in Utha
A roof leak is not just an inconvenience. Left alone, it can damage framing, insulation, drywall, flooring, and even your home's air quality.
The good news is that most serious problems start small. If we recognize the early signs, track down the source, and act quickly with repairs or a professional inspection, we can keep a manageable issue from turning into a major headache.
Whether you are dealing with an active leak right now or just want to be prepared, use this guide as a starting point. When in doubt about safety, the size of the problem, or the condition of your roof, reach out to a trusted local roofer like Vertex Roofing to inspect, repair, or replace your roof so your home stays dry, safe, and protected for years to come. For more resources, visit the Vertex Roofing blog or learn more about roofing repair services from Vertex Roofing.